Bandaging Wounds
Learn how to bandage injuries -- from head wounds to toe wounds.
In this article, you will find:
Arms, elbows, wrists, and ankles
Covering Arms and Elbows
Bandaging an arm or elbow is very much like bandaging a knee or a leg. Once you've cleaned and dressed the wound with an antiseptic cream, follow these steps:
- Bend the elbow you're wrapping.
- Place the center of the cloth in the crook of the arm.
- Circle the two ends around the upper or lower arm (depending on the location of the wound). Then knot and tie it.
You can also use the “spiral” technique for an arm. To do so, anchor one end of the cloth to the outside of the arm with tape, and then wrap the other end around the arm's wound, over and over. Secure the other end with adhesive tape or a safety pin.
Bandages for Wrists and Ankles
Wrap the knee and upper leg.
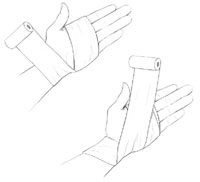
Think of an ice skater performing a figure-eight. That same twisting technique is effective for bandaging wrists and ankles. Here's how you wrap a wrist (after cleaning the wound).
- Tape one end of a long, clean cloth or gauze roll to the palm of the injured hand.
- Roll the gauze or cloth two or three times around the palm of the hand.
- Bring the gauze or cloth across the palm of the hand and then in-between the thumb and first finger.
- Pull the gauze diagonally across the outside of the hand to the wrist.
- Circle the wrist two or three times with the cloth.
- Repeat steps 1–5 until the wound and dressing are covered. Then secure the bandage at the wrist with adhesive tape or a safety pin.
Follow these steps to use the same technique for wrapping an ankle:

Bandage the instep and then the ankle.
- Tape one end of a long, clean cloth or gauze roll to the instep of the injured person's foot.
- Roll the gauze or cloth two or three times around the foot, moving from the instep to the back of foot, and from the back of foot to the instep.
- Then bring the cloth up across the front of the foot and around the ankle.
- Repeat this five to seven times.
- Add one final circle around the ankle.
- Secure at the ankle with adhesive tape or a safety pin.