How to Install Crown Molding
In this article, you will find:
Page 2
Step 3: Make a Cutting Jig
Step 4: Coping with Coping
Coped joints are joints that won't pull apart over time, as inside miter joints tend to do.
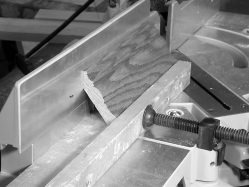
Start a coped joint by sawing a 45° miter, with the molding upside down in the saw. The bottom edge (as the molding will be on the wall) is longer than the top edge. Angle the coping saw to remove more wood from the back; otherwise, the joint may not close. Clamp the molding; these joints are hard enough to cut when the wood is not wandering from Seattle to Anchorage!
Step 5: Cutting Other Joints
Coped joints are only 99 percent of the battle in crown molding. You may also need outside miter joints, and scarf joints, used where two moldings meet on a straight wall.
Joining Outside Corners
Compared to inside corners, the miter joints used for outside corners are a snap-if the corner is square. To make these miter cuts, place the molding upside down in the jig. Cut so the edge toward the ceiling is longer than the edge toward the wall.
Use a square to check if the corner is square. If not, cut test miters on scrap wood; cuts on this corner must be more than 45°.
Making the Scarf Joint
To join crown molding along a straight wall, use a scarf joint. Hold the molding in the jig shown earlier. Cut 45° miters at the left end of one piece, and the right end of the other. A scarf joint makes a nearly invisible joint. Lay pieces with 45° miters next to each other. Nail through the top piece to tighten the joint.
Step 6: Nailing It Down
If the nails don't pull the molding tight to the wall or ceiling, use larger finish nails (2 1⁄2" or 3"). As a last resort, try skinny, 2 1⁄4" trim screws, with a countersunk hole for the screw head. These screws require more wood filler, but they really pull molding into position.
The nailer in back holds the molding steady while you nail. Drill pilot holes for the first nails, which locate the molding. After that, you may switch to hardened trim nails, which go right through hardwood without a pilot hole.
When the molding looks right, drive the nails below the surface, and fill and stain nail holes.