Wainscot a Wall
Page 3
Step 4: Finishing the Job
With the wainscot in place, turn your attention to molding. We used a variety called chair rail to finish off the wainscot. First we fastened a 3⁄4" × 3⁄4" hardwood spacer to cover the ends of the wainscot.
The Spacing Game
Building Smarts
Because the spacer will be covered, we attached it with 21⁄2" screws, countersunk so the chair rail will rest tight against the spacer. If you don't have a countersink bit, use a large, regular drill bit to make room for the screw head. Then drill a smaller hole for the screw shank.
The hardwood spacer will be visible behind the chair rail, so you've got to place it perfectly level. (It goes just above the original line used to locate the nailer.) As you level the spacer, don't worry if it doesn't touch the wainscot everywhere—the chair rail will cover the gap.
Fastening the Chair Rail
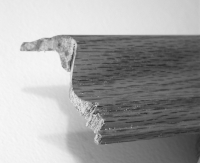
With the spacer in place, fasten the chair rail flush to the top of the spacer. Make outside corners in the chair rail with outside miter joints. Cut both pieces at 45°. (To be safe, make them 1⁄8" long until you get the hang of these cuts.)
An inside corner must be coped, or cut with a coping saw. Miter one end at 45°, with the front of the molding cut shorter than the back. Then cut down the new cut edge with a hand coping saw. A coped joint resembles an inside miter joint, but it won't pull apart!
Building Smarts
Coping makes an inside corner joint that won't pull apart with time. Although it's easier than it sounds, it helps to practice on scrap wood. Coping is also useful for installing baseboard and crown molding.
A slight upward angle on the nail places the head flat on the sloping face of the molding. Place pairs of nails every 16 inches, preferably above the studs, where they will be easier to drive. Drill hardwood molding before nailing.
A nailset makes the finishing touch on any molding job.