Build an Archway
In this article, you will find:
Forms, positioning, and attachment
Step 3: Making the Forms
My dictionary didn't include a good word for the plywood pieces that form the arch, so I will call them forms. Using the pattern, mark four arch forms on 3⁄4" plywood or OSB (oriented strand board), which is a cheaper replacement for plywood.
Step 4: Positioning and Attaching the Forms
Building Smarts
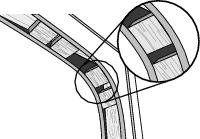
If the drywall is nailed directly to the studs, the forms will be the same size as the pattern. Each form will have one right angle and two pointy ends. If the wall surface is more than 11⁄ 4" thick, the forms will be nailed to the face of the studs, and the forms will be larger than the pattern, as shown in the follow-ing drawing. If the wall is even thicker than that, you may have to shim behind the forms.
Positioning the forms may be the most important part of this whole process. It is critical to place the forms one drywall thickness (usually 1⁄2") behind the finished wall surface.
If your drywall is fastened directly to the studs, the face of the form goes flush with the studs. For a 2 × 4 wall, you can achieve this by attaching a 2" nailer (piece added to hold nails) to the studs and the header. Taper the bottom of the nailer so that it doesn't push out the bottom of the arch. Then screw the forms to the nailer.
Now that you've chosen the form location, attach them:
- Screw each form in place. Place a 2" construction screw every 4 to 6 inches.
- Screw existing drywall near the joints.
- Screw the 1 × 4 and 2 × 4 blocking into position. The blocking will support the curved drywall strip on the bottom of the arch.
Step 5: Cutting and Attaching the Drywall
By now, you should be able to smell victory! If you've worked carefully, the drywall stage should be a snap. Just follow these steps:
Building Smarts
A jigsaw makes short work of curves, but a hand drywall saw would suffice.
Cut a strip of drywall for the underside of the arch, 1⁄4" narrower than the width between the form faces. Dampen the back so the drywall can bend (it takes about 30 minutes).
-
In tight curves, make parallel cuts on the back of the drywall, then fold it into place.
Starting at the bottom, push this strip tight against the forms and screw into place.
-
Mark the center of the arch. Hold a rectangle of drywall against one side of the arch, touching the center mark. From the back, mark the arch shape on the drywall.
With the drywall marked, cut the arch profile. Repeat for the other three forms.
Screw each piece of drywall in place. If the existing wall is loose around the edges, screw it as well.
Nail flexible corner bead every 4 inches or so along both faces. Nails lie flatter than screws. Use rust-resistant, phosphate-coated drywall nails. Smooth any imperfections that appear while you are nailing.
Make sure all nails or screws are below the surface. Run a trowel wherever you see fasteners. Drive raised fasteners deeper, and remove loose ones.
To finish the drywalling, skip to Step 7: Finishing Up.